MQTT Spy Advanced - HiveMQ MQTT Toolbox
Short Profile
| Attribute | MQTTBox |
|---|---|
| Type | Command line (console, headless) and GUI |
| License | Eclipse Public License & Eclipse Distribution License |
| Operating Systems | Any that supports Java 8 (e.g. Windows, Linux, MacOS) |
| Website | http://kamilfb.github.io/mqtt-spy/ |
General Information
Welcome back for the 3rd (and final) blog post about the mqtt-spy “family,” an open source utility help you monitor activity on MQTT topics. This post covers some of the advanced features of the GUI-based mqtt-spy and the headless mqtt-spy-daemon:
Scripted publications
Message content formatting and support for custom message envelopes (e.g. encoded, signed and/or encrypted payload)
Scripted subscriptions (with configurable handling of received messages, e.g. auto-reply)
Scripted message searching [mqtt-spy only]
Message audit – a log file can be created for all received messages; this could be used for replay (or off-line browsing [mqtt-spy only])
Automated testing with test cases
Scripting
For basic usage of both mqtt-spy and mqtt-spy-daemon there is no need to do any scripting.
There are however use cases which go beyond the out-of-the-box functionality – this is where scripting becomes extremely useful.
Scripting is a way of expanding the core functionality of mqtt-spy and mqtt-spy-daemon with virtually endless possibilities (well, almost…). Here are some sample use cases:
Automation
Functional and performance testing
Advanced message publications, e.g. custom envelopes with application-level security
Variable speed replay and simulations
Integration with any 3rd party Java libraries
Turning on your IoT-enabled kettle in the morning ;-)
Further sections will cover the key areas that enable scripting.
The scripts are provided as either external JavaScript files (*.js) or inline. Both mqtt-spy and mqtt-spy-daemon utilise Java’s built-in JavaScript engine called Nashorn.
For more information and more samples see the Scripting wiki.
Publishing messages
There are number of ways you can publish messages in mqtt-spy & mqtt- spy-daemon:Publication scripts
| Mechanism | mqtt-spy | mqtt-spy-daemon |
|---|---|---|
| Manual | Yes | - |
| Publication scripts | Yes | Yes (see background scripts) |
| Parametrised publication scripts | Yes | Yes (via API) |
| Subscription scripts | Yes (see the Receiving messages section) | Yes (see the Receiving messages section) |
| Test cases | Yes (see the Automated testing section) | Yes (see the Automated testing section) |
When manually publishing messages in the “Publish message” pane, you are limited by what you can type in the provided fields.
For all the other mechanisms listed above, publications are done using user-provided script files (with .js extension).
Let’s look at some examples now.
Basic scripts
The simplest script file can look like this:
mqttspy.publish("mqtt-spy/test1", "my first scripted publication");The above example is not much different from doing a manual publication though. The difference is when you want to either do something special to your message (e.g. generate a timestamp) and/or send multiple messages, e.g.:
function publish()
{
    for (i = 0; i < 10; i++)
    {
        mqttspy.publish("mqtt-spy/test2", "hello " + i + ": " + new java.util.Date());
        java.lang.Thread.sleep(1000);
    }
    return true;
}
publish();
Parametrised scripts
There are occasions however when you don’t want to predefine everything in the script, but only want to use it as a template for adding some extra info. To achieve that in mqtt-spy:
Create a script, e.g.
Then provide the topic and data you want to publish
Select the “Publish with script” menu item from the publication button’s menu:
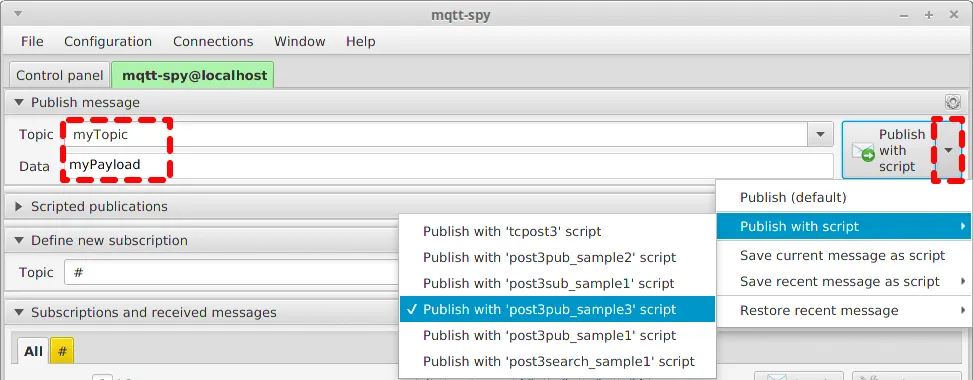
4. Use the button to trigger a publication – the result will be a message with a timestamp populated by your parametrised script
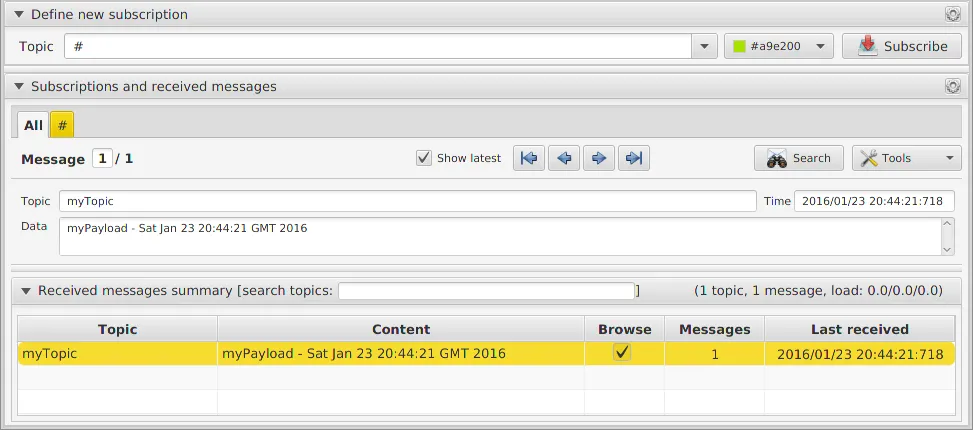
To achieve parametrised publications using mqtt-spy-daemon, you can define a generic script, and then pass a map of arguments (key/value pairs) to the script using the daemon’s API.
Saving favourite messages as scripts
If you use certain combinations of topic & payload quite often, it might be worth saving your message as a script, so that you can reuse it at a later stage. This is available from the publication button’s menu. You can save either the current message or one of the last 10 messages.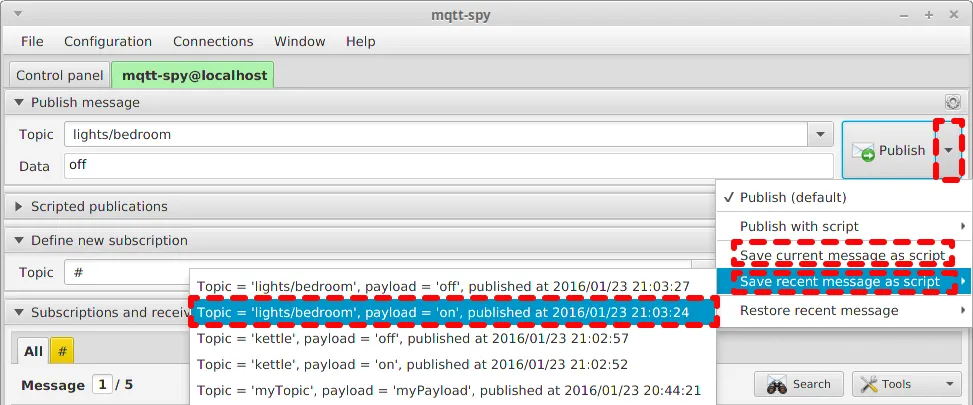
Once a script has been generated from the populated fields, you can use it and edit it in the same way as any other scripts.
Advanced scripting
You might thinking OK, what else can I do using those publication scripts? Here are some ideas:
use it as a means of favourite (most used) messages
create a continuously running script with while(true) {…};
perform sleeps to send messages at given intervals
publish images or other large binary files
perform a replay of previously recorded messages (message audit)
publish in multiple threads
run multiple scripts concurrently
wrap your message payload in an envelope (e.g. JSON or XML-based)
add application-level security: encode, encrypt or sign your payload
call external programs, OS commands or 3rd party Java libraries that are present on the classpath
combine all the above together!
For more information and more examples see the Scripted Publications wiki.
Receiving messages
There are a couple of things you can do with messages received on the defined subscriptions:
| Functionality | mqtt-spy | mqtt-spy-daemon |
|---|---|---|
| Reformat all received messages on a connection | Yes – see the Formatting section | Yes – see the Formatting section |
| Run a script specific to the defined subscription | Yes | Yes |
| Perform a search | Yes – see the Searching section | - |
| Write received messages to a message audit (log) | Yes – see the Message audit section | Yes – see the Message audit section |
Formatting
In mqtt-spy and mqtt-spy-daemon “formatting” is a means of modifying the payload of all messages received on a connection. This can be used for supporting environments where all messages use one or combination of the following:
Envelope (e.g. XML-based), and you just want to extract the body of the messages
Encoding (e.g. HEX or Base64) or compression, where you want to see the decoded content
Signature, to confirm it is a valid message
Encryption, to automatically decrypt the payload
For basic requirements, it might be sufficient to use one of the default formatters:
encode to HEX
decode from HEX
encode to Base64
decode from Base64
For more advanced users it is recommend to use scripted formatters. For both mqtt-spy and mqtt-spy-daemon they are stored in the XML configuration (and are Base64 encoded). To make configuring and testing them easier, you can also define them via the mqtt-spy UI (Menu → Window → Open view → Formatters):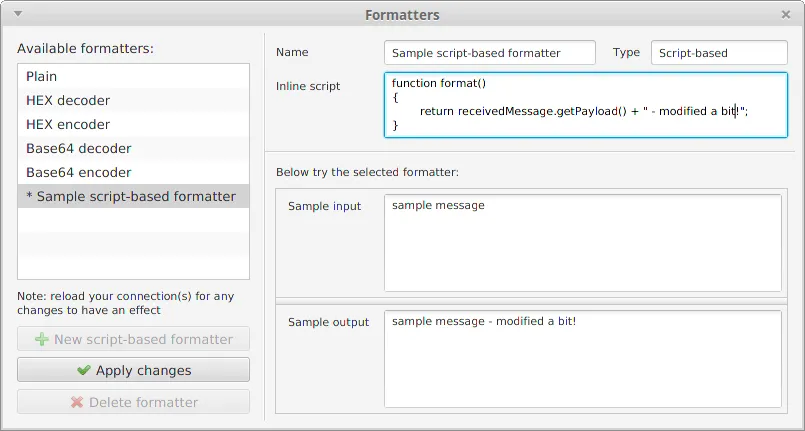
Sample formatting script:
function format()
{
    return receivedMessage.getPayload() + " - modified a bit!";
}
Please note that each formatting script requires the format function, which returns the modified payload. You can access the received message using the receivedMessage object.
An optional before function can also be defined to set-up any additional resources for all subsequent calls to the format function.
On message scripts
The “on message” scripts are run specifically for each defined subscription. The following methods are supported:
before (optional), called shortly after creating the subscription; can be used for setting any additional resources for all subsequent calls to onMessage
onMessage, called for each message received; use the receivedMessage object to access all its properties, e.g. topic, payload, QoS, retained
after (optional), called when you unsubscribe; can be used for cleaning up any unwanted resources
Below is a sample subscription script that automatically sends a reply:
function onMessage() {
    mqttspy.publish(
        "reply", // Topic
        "<reply>" + "<originalMessage>" + receivedMessage.getPayload() + "</originalMessage>" + "</reply>", // Payload
        0, // QoS
        false);  // Retained
    return true;
}
Sample use cases for having the “on message” script:
custom logging
auto-reply (see above)
writing to a database (e.g. MongoDB)
calling external programs, OS commands or 3rd party Java libraries that are present on the classpath
For more information and more examples see the Scripted Subscriptions wiki.
Searching (mqtt-spy only)
From the 1st blog in the series you might know that you can search through the received messages – either all, on a given subscription or just from a single topic.
By default, mqtt-spy only checks if the provided string is contained in the (formatted) payload of each message. To give you more flexibility what messages to search for, you can either use in-line scripts or point at external script files.
To switch between the particular mode, use the Search button’s menu (as shown below).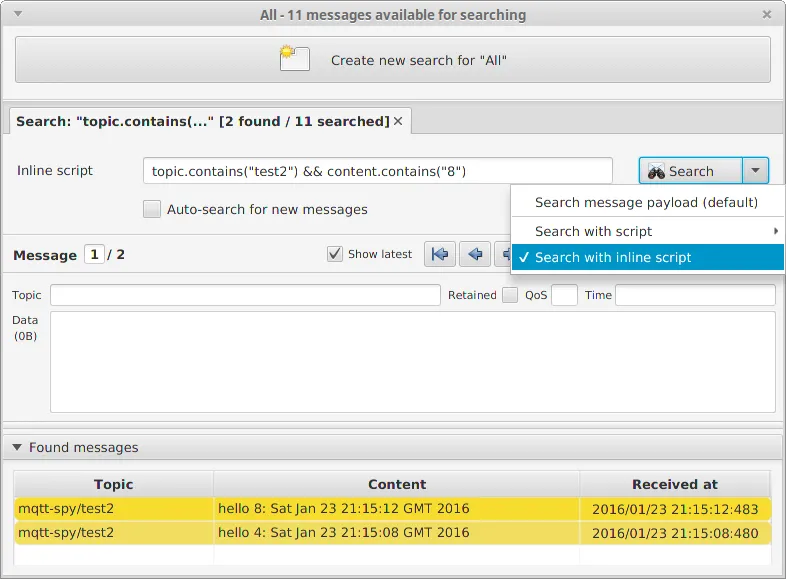
For more information and samples see the Message Search wiki.
Inline scripts
Inline scripts can be either written in the simplified form, e.g.:
topic.contains("test") && content.contains("temp")or the expanded form (without the helper variables), e.g.:
message.getTopic().contains("test") && message.getPayload().contains("temp")External scripts
An external search script requires you to return either true (for matched messages) or false.
To access the properties of the message use the message object as in the “inline” example above, e.g.:
function search() {
if (message.getTopic().contains("test") &amp;&amp; message.getPayload().contains("temp")) {
return true;
}
return false;
}
search();Message audit / Replay / Offline browsing
Creating a message audit
mqtt-spy’s message auditing is a way of storing received messages in a format that can be used for other purposes – e.g. replay, offline browsing, custom processing and analysis etc.
There are a number of ways of creating a message audit log:
By enabling message auditing on all connection’s received messages (both mqtt-spy and mqtt-spy-daemon) – see the Message Audit wiki for details
By exporting browsed messages in the message audit format (only mqtt-spy)
By creating it manually or converting from a different format (e.g. CSV)
Replay
Both mqtt-spy and mqtt-spy-daemon allow you to replay a message audit log file. You can either replay messages at constant intervals, or the actual intervals as the messages were received and logged.
The replay is done by an appropriate script, giving you access to all these options. One of the key features of the replay is the capability to run the replay at your chosen speed – e.g. 5 times the speed the messages were captured as.
See the Replay wiki for details.
Offline browsing
Apart from spying on messages that are being sent through the MQTT broker, you can also analyse previously captures messages, without establishing any connections.
To open a message audit log file, select Window → Open view → Message audit browser menu, select the file you want to load, and wait for a new tab to appear.
The functionality for browsing and searching for messages will be similar to a normal connection. 
Automated testing with test cases
Test cases functionality available in mqtt-spy and mqtt-spy-daemon combines scripted publications and subscriptions into a single package. This means that rather than manually testing the behaviour of your system, you can define actions and expectations as an automated test.
After tests have been run, a CSV-based report can be generated for both the individual test steps within a test case and all test cases.
Note that when triggering actions or checking expectations, these don’t have to be purely MQTT pub/sub related – e.g. an action could be a SOAP request, and a verification step could check if you got the right message(s) back. For further information and examples see the Test Cases wiki.
API
There are a few things to remember when writing test cases. Each has to follow these rules:
A test implements the getInfo function to define the name of the test and the individual steps
stepX functions (where X is from 1 to the number of steps defined in the getInfo)
Each step returns a TestCaseStepResult, with either:
Actioned – all actions executed, nothing to check
Skipped – step ignored
Passed – all OK
Failed – for failing the verification criteria
Error – for reporting unexpected error
In progress – for repeating a step execution
Sample test case
In its simplest form, you could define a test case with 3 steps:
Set-up and subscribe to a topic
Publish a message to the defined topic
Check if you received a message with the right content and on the defined topic
Once all steps have been executed and all assertions met, the test case is considered to have passed.
Below is a sample test case in which mqtt-spy tests itself for performing basic subscriptions and publications.
var TestCaseStepResult = Java.type("pl.baczkowicz.spy.testcases.TestCaseStepResult");
var TestCaseStatus = Java.type("pl.baczkowicz.spy.testcases.TestCaseStatus");

var getInfo = function ()
{
    var TestCaseInfo = Java.type("pl.baczkowicz.spy.testcases.TestCaseInfo");
	var info = new TestCaseInfo();
	info.setName("Pub/sub test");
	info.getSteps().add("Subscribe to test topic");
	info.getSteps().add("Publish a sample message");
	info.getSteps().add("Verify if received the correct message");

	return info;
};

var step1 = function ()
{
	// Subscribe to messages
	mqttspy.subscribe("testcase/#", 0);
	return new TestCaseStepResult(TestCaseStatus.ACTIONED, "Subscribed");
};

var step2 = function ()
{
	mqttspy.publish("testcase/step2", "sample message 1", 0, false);
	return new TestCaseStepResult(TestCaseStatus.ACTIONED, "Message published");
};

var step3 = function ()
{
	// Wait up to a second to received the expected message
	java.lang.Thread.sleep(1000);

	// Check if received
	var messages = mqttspy.getMessages("testcase/#");

	var lastMessage = messages.size() > 0 ? messages.get(0).getPayload() : "";

	if ("sample message 1".equals(lastMessage))
	{
		return new TestCaseStepResult(TestCaseStatus.PASSED,
						"Correct message received");
	}

	return new TestCaseStepResult(TestCaseStatus.FAILED, "Incorrect message received");
};
And this is how it looks like when you run it in the GUI: 

Wrap up
Hopefully after reading this and the previous two blog posts about mqtt-spy and mqtt-spy-daemon you have a better understanding of how they can help you. There are some other awesome MQTT tools available, so check them too! Depending on what you need, they might be more suited for your use case.
Eclipse Paho
For all its MQTT connectivity, mqtt-spy & mqtt-spy-daemon use the Eclipse Paho Java client – a rock-solid library allowing applications to connect to any MQTT-compliant broker.
As of January 2016, mqtt-spy & mqtt-spy-daemon are also part of Eclipse Paho & Eclipse IoT.
How to get involved
All contributions to the project are very welcome! Whether it is a bug report, a feature request, a bug fix, a feature implementation or just a suggestion – they are all very much appreciated. Get in touch via the GitHub page or Twitter (@mqtt_spy).
If you liked the “mqtt-spy” posts, please consider donating 1 of whatever currency you use (e.g. €1, $1 or £1) to UNICEF. You can do it via http://www.justgiving.com/mqtt-spy or directly on UNICEF websites. Anything counts!

